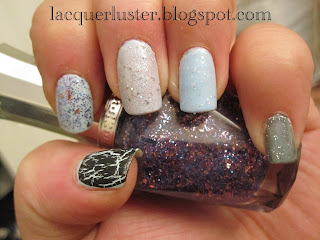
I did this mani a couple of weeks ago but didn't have a chance to post it until now! I really wanted to try LFN over a color that kind of matched the base, so that it would look like the glitter was embedded in the polish rather than just painted on top. I think I found a pretty good match!
For a while I wasn't that into the idea of glittery topcoats, I preferred polishes that were more opaque. I'm really having fun with this one, though! Can't wait to try it with some other blues.
I also recently got a Bergdorf Goodman gift card and used it to buy some Chanel polishes:
I want to try these out soon. Honestly I probably wouldn't have purchased them with my own money but I didn't mind "splurging" with a gift card.
Monday, February 28, 2011
Thursday, February 24, 2011
Floral Print w/ Lavender Tips
This design was inspired by a post in one of my favorite nail blogs, Cynful Nails. I've wanted to do it since I first saw it, but I wanted to grow my nails out a bit and file them into an oval shape. Isn't it cute? Mine didn't turn out quite as well, but I still love it. I think it might look better on longer nails.
Here are the materials:
Nail polish remover, a small piece of foil, some toothpicks (not pictured), rhinestones, cotton pads, nail art brushes (one with short bristles, another with longer bristles for striping), acrylic paint (I used magenta, white, and green), top coat, base coat, and the following polishes: MAC Vestral White, Diamond Cosmetics Like Satin, Essie Lilacism, and Color Club Sultry Diva.
The first step is to paint the base. I used four coats of Vestral White plus Like Satin to give it an ivory tone. I think this makes it look a bit more vintage. Like Satin is really sheer so I thought it would be easier to layer it on top of a white, but you can just use an off-white polish if you have one, of course.
Next, I used the striping brush to paint curves at the tips with Lilacism, then used the bottle brush to fill them in:
The next step is to squeeze out a little magenta paint and add some dots (for the flowers):
This is much more paint that is needed, you really only need a small drop. I used the short-bristled nail art brush for the circles:
For the gold glitter line, I added a generous drop of Sultry Diva to a small piece of foil:
Dropping the polish onto the foil lets it dry a bit so that the glitter can get a bit more concentrated and you don't need as many coats. Add more as needed (I think I needed three or four drops total), and paint over the curves you made with the lavender polish, using the striper brush again:
For the second color on the flowers, I mixed in some white paint with the leftover magenta (I used a toothpick, as you can see):
Using the short-bristled nail art brush, just dab at the dots you made earlier, painting on tiny dots and lines (this might be better to do with a toothpick):
For the leaves, I mixed the green paint with some white:
I used a toothpick to paint them on:
The final step is to glue on some rhinestones, then top it all off with top coat!
Ta-da! It was quite a bit of work, but I love it! So feminine and perfect for spring! This was my first time using acrylic paint for nail art, but I definitely prefer it over using nail polish. The paint is more pigmented and easier to work with so you can do more detailed work with a smaller amount. It also dries much more quickly than nail polish (or perhaps it's because you don't need to use as much). I'm excited to try more nail art!
I think I might do this mani again for my birthday next month; since it will be my second time I hope it will turn out even better!
Here are the materials:
Nail polish remover, a small piece of foil, some toothpicks (not pictured), rhinestones, cotton pads, nail art brushes (one with short bristles, another with longer bristles for striping), acrylic paint (I used magenta, white, and green), top coat, base coat, and the following polishes: MAC Vestral White, Diamond Cosmetics Like Satin, Essie Lilacism, and Color Club Sultry Diva.
The first step is to paint the base. I used four coats of Vestral White plus Like Satin to give it an ivory tone. I think this makes it look a bit more vintage. Like Satin is really sheer so I thought it would be easier to layer it on top of a white, but you can just use an off-white polish if you have one, of course.
Next, I used the striping brush to paint curves at the tips with Lilacism, then used the bottle brush to fill them in:
The next step is to squeeze out a little magenta paint and add some dots (for the flowers):
This is much more paint that is needed, you really only need a small drop. I used the short-bristled nail art brush for the circles:
For the gold glitter line, I added a generous drop of Sultry Diva to a small piece of foil:
Dropping the polish onto the foil lets it dry a bit so that the glitter can get a bit more concentrated and you don't need as many coats. Add more as needed (I think I needed three or four drops total), and paint over the curves you made with the lavender polish, using the striper brush again:
For the second color on the flowers, I mixed in some white paint with the leftover magenta (I used a toothpick, as you can see):
Using the short-bristled nail art brush, just dab at the dots you made earlier, painting on tiny dots and lines (this might be better to do with a toothpick):
For the leaves, I mixed the green paint with some white:
I used a toothpick to paint them on:
The final step is to glue on some rhinestones, then top it all off with top coat!
Ta-da! It was quite a bit of work, but I love it! So feminine and perfect for spring! This was my first time using acrylic paint for nail art, but I definitely prefer it over using nail polish. The paint is more pigmented and easier to work with so you can do more detailed work with a smaller amount. It also dries much more quickly than nail polish (or perhaps it's because you don't need to use as much). I'm excited to try more nail art!
I think I might do this mani again for my birthday next month; since it will be my second time I hope it will turn out even better!
Tuesday, February 22, 2011
China Glaze Fault Line Over OPI Bring On The Bling
I received my China Glaze Crackle polishes today! I played around with them a bit, just painting them over my current mani:
I messed up the purple one a bit, tried to apply it differently but it didn't quite work out.
I also did a comparison of CG Black Mesh next to OPI Black Shatter:
Black Mesh on pointer and ring, Black Shatter on middle and pinky. It seems like you can get either more or less cracks with both, it just depends on how you apply it. Black Mesh dries a bit more slowly, though, so it's easier to work with. I'll have to do a bit more experimentation.
Here's my first Crackle mani:
Fault Line over OPI Bring On The Bling. I was dying to use this over a glitter, and I thought a multi-colored glitter base would be really interesting. I love this combo! I did two coats of BOTB; I wasn't worried about it being completely opaque, but coverage was good.
I wasn't sure at first if I really liked these cracking polishes, but I guess it just takes the right combination!
Monday, February 21, 2011
Recent Nail Polish Hauls
Bought these in the past ten days or so:
MAC Wonder Woman Spirit of Truth and Obey Me
Hello Kitty Bubble Gum and Purple Sprinkles
pa A113, OPI Black Shatter, Last Friday Night, Teenage Dream, and Castledew Purple Miracle. Here is one coat of each over Hard Candy Sky:
Thumb to pinky: Black Shatter, Purple Miracle, Teenage Dream, Last Friday Night, A113. I will definitely need some practice applying Shatter. Last Friday Night kind of reminds me of Purple Sprinkles, I wonder how they compare?
I love playing with all of these, can't wait to really test them out!
Friday, February 18, 2011
Hard Candy Sky: Old vs. New
I first became interested in nail polish when I was 11 or 12 years old, especially light blue nail polish. My biggest lemming at the time was Hard Candy Sky. I thought it was the most perfect light blue I'd ever seen, but at the time the $10-12 dollars it retailed for was too much for me. I would always look at it longingly in its pretty bottle with the cute matching ring, but instead of buying it I settled for a no-name brand that cost $3. It wasn't the same, though, but I forgot about it after a few years and my nail polish obsession really disappeared for a long time.
Fast-forward to 2009, when my nail polish obsession came back in spades! I searched for HCS on ebay every once in a while, but was hesitant to spend the $15+ many were charging for it (I guess some things never change!). I finally won an auction for a bottle of Sky and Jailbait for about $14 shipped? I was super excited to receive the bottle. Of course, a couple of weeks later, I was at Walmart and saw that Sky had been re-released! I decided to pick up a bottle just in case it was different.
So, here is my first nail polish lemming with its newer counterpart, side by side:
The most obvious difference is the packaging, of course. The bottles have different fonts, different amounts (the older one is on the left, with .5 oz. versus the newer bottle with .35 oz.), and different rings (the older one is made of a stretchier material, like jelly shoes, while the newer one is hard plastic). The older one looks just a tinge more greenish, but I think that might be due to its age.
On the nail, they look identical:
There is a subtle shimmer you can see in the bottle, but it's almost invisible on the nail. You can see it if you look very closely in bright light but it's hardly worth mentioning. The formulas were almost the same as well. The newer version was slightly thicker, but both were very streaky and required four coats to smooth out. I believe the older version also took just a little bit longer to dry. The most significant difference to me was the difference in the size of the brushes. Here they are, side by side:
Left is from the older bottle, right is the newer one. There doesn't seem to be much of a size difference, but the older brush is wider, thicker, and more flexible, making application easier. Other than the brush though, these polishes are pretty much the same.
I suppose this color isn't particularly unique, but I adore it and will always remember it as my first nail polish love. It was also one of the first Hard Candy nail polish colors (if not the first), so it's kind of like owning a bit of nail polish history. Out of the several light blues I own now, I still consider this one my favorite (probably always will).
Hard Candy makeup is available at Walmart.
Thursday, February 17, 2011
Sally Hansen Nail Prisms Purple Diamond LE and Pink Rose Diamond
So I heard about SH Nail Prisms on Scrangie's site, and I was really curious so I did a Google image search. They looked amazing! Of course, when I looked for them on ebay most colors cost an arm and a leg, especially popular ones like Garnet Lapis and Diamond (not LE). The following two colors you can usually find for a reasonable price ($5-7) so I decided to buy them.
First, Purple Diamond Limited Edition:
It's kind of a dusty purple holo. From what I understand, this bottle shape means it's limited edition, but I would recommend looking for the regular bottle (as follows). I believe the polish that comes in the regular bottles have a much stronger holo effect, you can't even tell this is a holo from the bottle alone. That said, under the right lighting it is very pretty. Formula kind of sucked, it was thin, sheer (this is four coats), and never dries. I wonder if all older polishes are like this? Again, I would look for the regular bottle.
Pink Rose Diamond:
This one comes in the regular bottle and the holo effect is pretty strong. It's more of a linear holo whereas the LE is a diffused one. It's a beautiful magenta holo, and even in low lighting it's sparkly. In the right lighting the holo effect is very strong. Same formula problems, but it's such a gorgeous color! I waited about an hour for it to dry before I got frustrated and added a coat of Seche Vite, but it never fully dried (I can still make dents if I press my nail into the polish).
Overall, it's probably better to invest in some Nfu-oh but I thought these were pretty different from their offerings. Why don't they make colors like this anymore??
Labels:
holo,
pink,
purple,
Sally Hansen
Monday, February 14, 2011
Color Club Spring 2011: Starry Temptress and Wicked Sweet
I don't think I've seen previews for this anywhere but I got the pictures and info from the Color Club website.
Starry Temptress
"Color Club lets you SPARKLE with STARRY TEMPTRESS, an OTHERWORLDLY collection of STAR-MAKING SHADES that brings
BOLD COLOR and GLITTER DETAIL together. Brush on our “STARRY TEMPTRESS” TOPCOAT for MEGA-SHINE and extra TWINKLE!"
Wicked Sweet
"Color Club serves up Wicked Sweet, a LUSCIOUS collection of VIBRANT COLOR. Once DRY, these fun, DELICIOUS SHADES Become FRUIT SCENTED and totally irresistible!"
NEONS! I looove neons, and now glitter neons and scented neons?? Sooo excited for this! They are already available at 8ty8beauty.com, but I am hoping I will be able to find them at my local Ross soon! Who knows, though, I might just end up taking the plunge anyway!
Labels:
Color Club,
glitter,
neon,
scented
Thursday, February 10, 2011
Red/Black Mani with Black Rhinestones
I think this will be my last V Day mani for this year, but it might be my favorite so far!
I used OPI Rock-a-pulco Red! and American Apparel Hassid. Pretty easy to figure out: paint a red base, paint the black parts, add rhinestones, touch up the black parts if necessary, add top coat. I'm not sure the half hearts were such a good idea, it's kind of hard to tell what they are. I skipped them on my right hand:
Either way though, I think it's a very elegant look for Valentine's Day or any special occasion.
The red came out a bit more coral-like in the pictures, but it's darker IRL. I wish I weren't so bad at taking pictures, it's such a pretty color. It's a frost, but it's not very brushstroke-y and there's a lot of depth. The shimmer really adds to the elegance of the mani and overall it's one of the best reds I've ever used. Here's a slightly better representation of the color:
Single or not, hope you all have a great V Day!
Saturday, February 5, 2011
Ikea Helmer
I have been wanting this for a while and was finally able to get one! It's the Helmer from Ikea:
It's a great way to organize nail polish! There are six little drawers and each one is exactly deep enough for pretty much all nail polish. I used to keep them in Sterilite containers, but I already had five of them and was running out of room. Plus, it was a pain to have to move them around to look for the colors I wanted. Having everything in drawers is much easier! The drawers are roomier and I even had room for all my makeup.
First drawer: lip, cheek, face
Second: eye stuff (shadow, liner, mascara, primer)
Third: nail art stuff, treatments, clippers, files
Fourth: top coats and base coats, MAC, Catrice, Chanel, China Glaze, Dior, and loners
Fifth: Color Club, Essie, American Apparel, Hard Candy, Diamond Cosmetics
Sixth: Orly, RBL, OPI, Milani, Misa, Eyeko, Sally Hansen, Love & Beauty, Zoya
So happy with the Helmer! Besides the great organization, it protects the polishes and makeup from sunlight. The only complaint I have is that it was quite a bit of work to put together, but it wasn't too hard and it's pretty much par for the course when you buy stuff from Ikea. I really love the fact that the height is perfect for nail polish bottles. The nail polish racks I had been looking at were $25 to hold 50 bottles or so. I have a little over 200 and as you can see, the bottles take up three drawers with plenty of room to spare. For $40, I consider it a bargain!
Subscribe to:
Posts (Atom)