
Showing posts with label blue. Show all posts
Showing posts with label blue. Show all posts
Sunday, March 10, 2013
Koi Manicure


Tuesday, November 8, 2011
Ghost Mani and Some Shopping!
I've been so busy lately with midterms and papers, whew! Finally have a little time to post.


This mani is a bit late for Halloween but I wanted to share anyway:

This was inspired by a design by Asami. I used China Glaze Frostbite, Sinful Colors black nail art striper polish, and white acrylic paint. My ghosts aren't as good as hers but you get the idea. I added the little gems for a little extra sparkle. Happy belated Halloween!
So what is better for all the school stress than a little retail shopping? Or a lot, actually...

The new Hello Kitty x Tokidoki collection is too cute! I couldn't resist.
More shopping hauls to come later. Can't resist the sales!
Wednesday, September 28, 2011
Dodgers French
They were giving out Dodgers Hello Kitty plushes a couple weeks ago so I had to go, of course. I did my sister's nails for the game.
 It was a collaboration between us, both the design and the work. She did the lettering, I did everything else. The blue tips were done with Blue from Love & Beauty (Forever 21) and red glitter heart was done with Milani Red Sparkle. The letters were done with acrylic paint and we added some jewels and I did a 3D acrylic blue bow. She added Sally Hansen Hidden Treasure and an iridescent glitter polish on top for some extra sparkle.
Go Dodgers! :)
Go Dodgers! :)
Saturday, September 10, 2011
Navy/Pink with Hearts
Blah, been so busy with school lately! I'm a full-time student x2 so I don't have as much time to do my nails. I'm trying to make some time, though. It's a hobby of mine and I do it to relax. I did find out that my esthetician class allows pretty much anything on your nails as long as the polish isn't chipped and your nails are short, yay!
Anyway, here's what I've had on my nails recently, first pic is from a magazine. Please ignore the tip wear, these were taken a couple days after I did my nails (oh, and a couple pieces of glitter are missing!).


I tried using the little gold bullion beads but it was too difficult, the beads and glue were getting everywhere. It would have been a lot easier to use a tiny pop ball chain but I don't have one (yet). So, I thought some hex glitter would be a pretty good substitute. Also, in the magazine it looks like they used both pink and a peachy color, but I thought it would be a little too random-looking. It ends up looking pretty random anyway but I actually got lots of compliments (I think people like hearts!). The navy blue jelly is Nfu-oh 119, the pink is Essie Neo Whimsical. I do really like the contrast of the navy and pink, I'll have to keep that in mind.
Monday, July 4, 2011
Fourth of July Mani
Happy Fourth, everyone! I wish I had been able to post this before today but I actually didn't even think about doing a 4th of July mani until late last night. Here it is:

The white base is MAC Vestral White, the red is OPI Rock-apulco Red, the blue is Blue from love & beauty (sold at Forever 21, same as L.A. Girl), and the glitter polish is Deborah Lippmann Today Was a Fairytale. I used a striping brush (you can find them cheap on ebay) for the stripes. My right hand actually turned out okay, though the stripes are a bit thicker and messier, haha. I realized after finishing my mani that it looked a bit abstract but if you want to make it look more reminiscent of a flag you can always to horizontal or vertical stripes instead of diagonal, or paint on stars or use star-shaped glitter instead of a glitter polish.
Hope the weather is nice for all of you and you get to eat some yummy BBQ!
Thursday, June 30, 2011
Nfu-oh 65
So I think my laptop is fried but at least I'm able to use my old PC for now. It's slow but it works!
On to the polish. Finally got my hands on this one! It wasn't even in stock when I was in Korea so I had to wait to order them from fabuloustreet.com.


Nfu-oh 65 is a light blue linear holo. I like it, but it's not as holo as my 61, I wonder if this one is a dud? Still very pretty. The formula was the same as all the linear holos I've tried, a bit liquidy but easy to work with. I wore one coat of Aqua Base, then one coat of polish, then another coat of AB, then another coat of polish (no top coat). I heard this would make the mani last longer but I didn't notice much of a difference. Also, maybe that would account for the polish not being quite as holo as it should be? In any case, still a very pretty color!
Thursday, June 16, 2011
Glitter Bindhi Mani
I saw this design in a magazine and it really caught my eye:
 I love the way it looks like a beautiful, intricate bindhi design, so sparkly, feminine, and elegant. It also didn't look too hard (no time-consuming florals!) so I thought I'd try it out.
Here are the polishes I used:
 Top row L to R: Milani Blue Flash, Color Club Take Me To Your Chateau, OPI Last Friday Night
Bottom row: no-name fuchsia glitter polish from Transdesign, Essie Splash of Grenadine, OPI Teenage Dream
First step was to paint little crescents with the glitter polishes, then shape them while the polish is still wet. I used a popsicle stick but an orange stick would be ideal.

Next, I painted French tips with the cream colors. I did this freehand but you can always use sticker guides of course.

Then, I added the sheer glitter toppers. As you can see the tips got a bit smeared so I would advise that you kind of pat the glitter on the tips rather than paint them on. This will minimize the smearing.

Last step was to add the pearls and rhinestones and a thick layer of topcoat:


After I had finished I realized I should have used a slightly darker blue but I still love the results! Rhinestone designs are a fairly easy way to make seemingly ornate designs without much effort. If you're not sure what you want I recommend buying one of the multi-sets on ebay for cheap. Born Pretty Store also has a whole kit you can buy with various rhinestones, orange sticks, dotting tools, and nail glue (link is my referral link).
If you're looking for nail art that is fairly easy but impressive, try this one!

Here are the polishes I used:

Bottom row: no-name fuchsia glitter polish from Transdesign, Essie Splash of Grenadine, OPI Teenage Dream
First step was to paint little crescents with the glitter polishes, then shape them while the polish is still wet. I used a popsicle stick but an orange stick would be ideal.

Next, I painted French tips with the cream colors. I did this freehand but you can always use sticker guides of course.

Then, I added the sheer glitter toppers. As you can see the tips got a bit smeared so I would advise that you kind of pat the glitter on the tips rather than paint them on. This will minimize the smearing.

Last step was to add the pearls and rhinestones and a thick layer of topcoat:


After I had finished I realized I should have used a slightly darker blue but I still love the results! Rhinestone designs are a fairly easy way to make seemingly ornate designs without much effort. If you're not sure what you want I recommend buying one of the multi-sets on ebay for cheap. Born Pretty Store also has a whole kit you can buy with various rhinestones, orange sticks, dotting tools, and nail glue (link is my referral link).
If you're looking for nail art that is fairly easy but impressive, try this one!
Tuesday, June 14, 2011
Marble Confetti Mani
I've always thought that water marble manis looked cool but I had no idea how difficult it was! I had to experiment with a few different polishes before I got it right and also messed up a few nails before I got some decent patterns (decent, not great!).
I started with a white base, MAC Vestral White:

These are the colors I used:
 L to R: Diamond Cosmetics Orange Blush, Color Club Almost Famous, Nfu-oh 553, American Apparel Office, Color Club Take Me To Your Chateau
Here is the first nail:
 I couldn't find tape so I had to clean up all the polish from my skin later (didn't want to use Vaseline or something oily b/c it might leave a film in the water, preventing the drops of polish from spreading correctly).
Afterward, I added some heart-shaped glitter and colorful rhinestones. Here's the finished product:

 It's not quite what I hoped for but I still think it looks fun, like birthday party decorations!
For more detailed instructions on water marbling (and better designs) check out this blog:
http://mysimplelittlepleasures.blogspot.com/
She's so pro! Hopefully I'll be just as good some day!
I started with a white base, MAC Vestral White:

These are the colors I used:

Here is the first nail:

Afterward, I added some heart-shaped glitter and colorful rhinestones. Here's the finished product:


For more detailed instructions on water marbling (and better designs) check out this blog:
http://mysimplelittlepleasures.blogspot.com/
She's so pro! Hopefully I'll be just as good some day!
Thursday, June 9, 2011
Pink Nails with Jewels and Floral Accent
I was looking for a simple nail art design to try and found this one:

I thought it was really cute, I love the contrast of the navy nail against the pink nails, and that the flowers on the accent nail match the pink of the other nails. I didn't quite execute it as nicely, though; I need to work on my florals! Here's how it turned out:


I used Hello Kitty nail polish in Bubble Gum for the pink, Diamond Cosmetics Midnight Blue for the navy. The flowers were painted on with acrylic paint using a small brush and a toothpick. I attached a mix of rhinestones, bullion beads and hex glitter on the sparkly nails.
Looking at the design now, it kinda looks random, not as cohesive as I thought. I still like it though! Nail art is always fun!
Tuesday, May 17, 2011
Nfu-oh 52
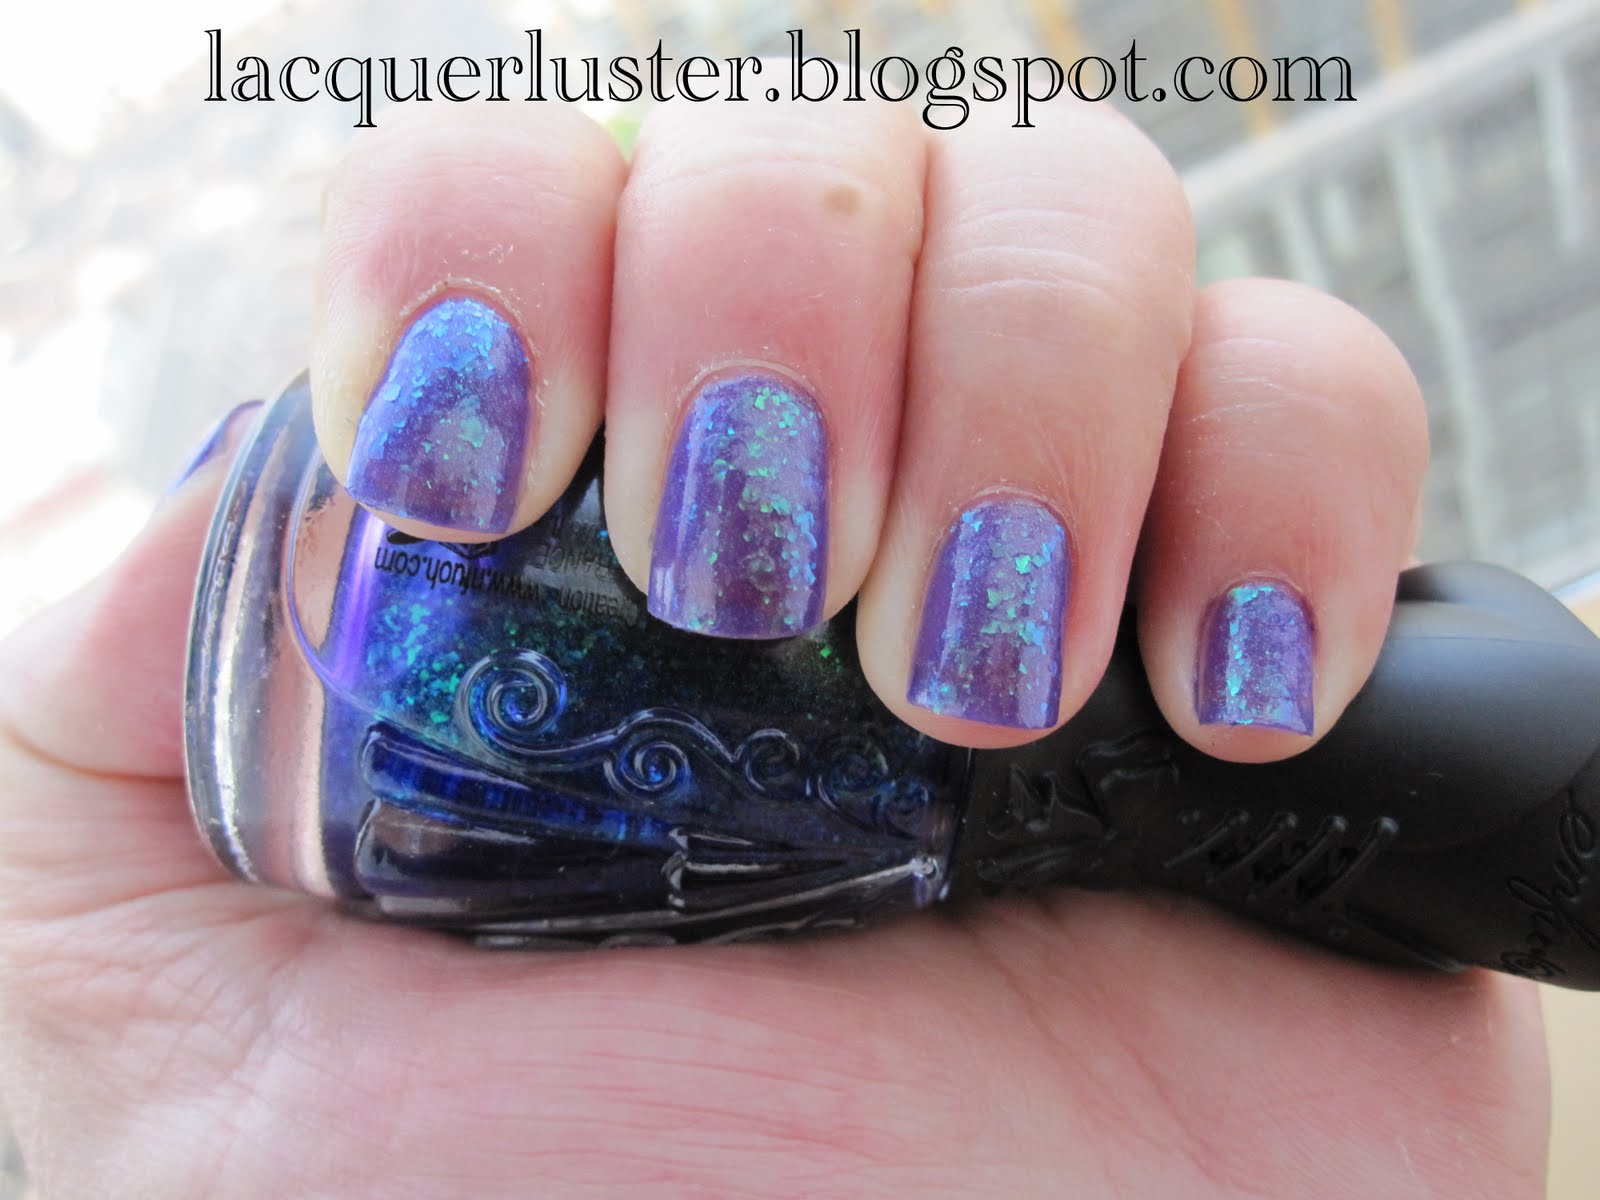
I really wish I had purchased more Nfu-oh now that I'm back, but I'm just glad I was able to score the beauties I did. Here's number 52:

 It's a sheer blue-based purple jelly with flakes that shine blue or green depending on the angle and lighting. This is four coats with no base or or top coat. There's still a bit of VNL but it's not very visible when my nails are this short. This color is beautiful, I really could not stop staring at my nails. My only complaint is that it did not dry very quickly, took quite a while actually. Still, the color is worth it and it lasted quite a long time.
Here it is with Essie Matte About You on top:
 Mattifying it tones down the shimmer/microglitter and brings out the flakes. Very pretty.
Still have quite a few untried Nfu-oh but so far I have not been disappointed!

Here it is with Essie Matte About You on top:

Still have quite a few untried Nfu-oh but so far I have not been disappointed!
Saturday, May 14, 2011
Missha HGR001 (Green/Teal Duochrome)
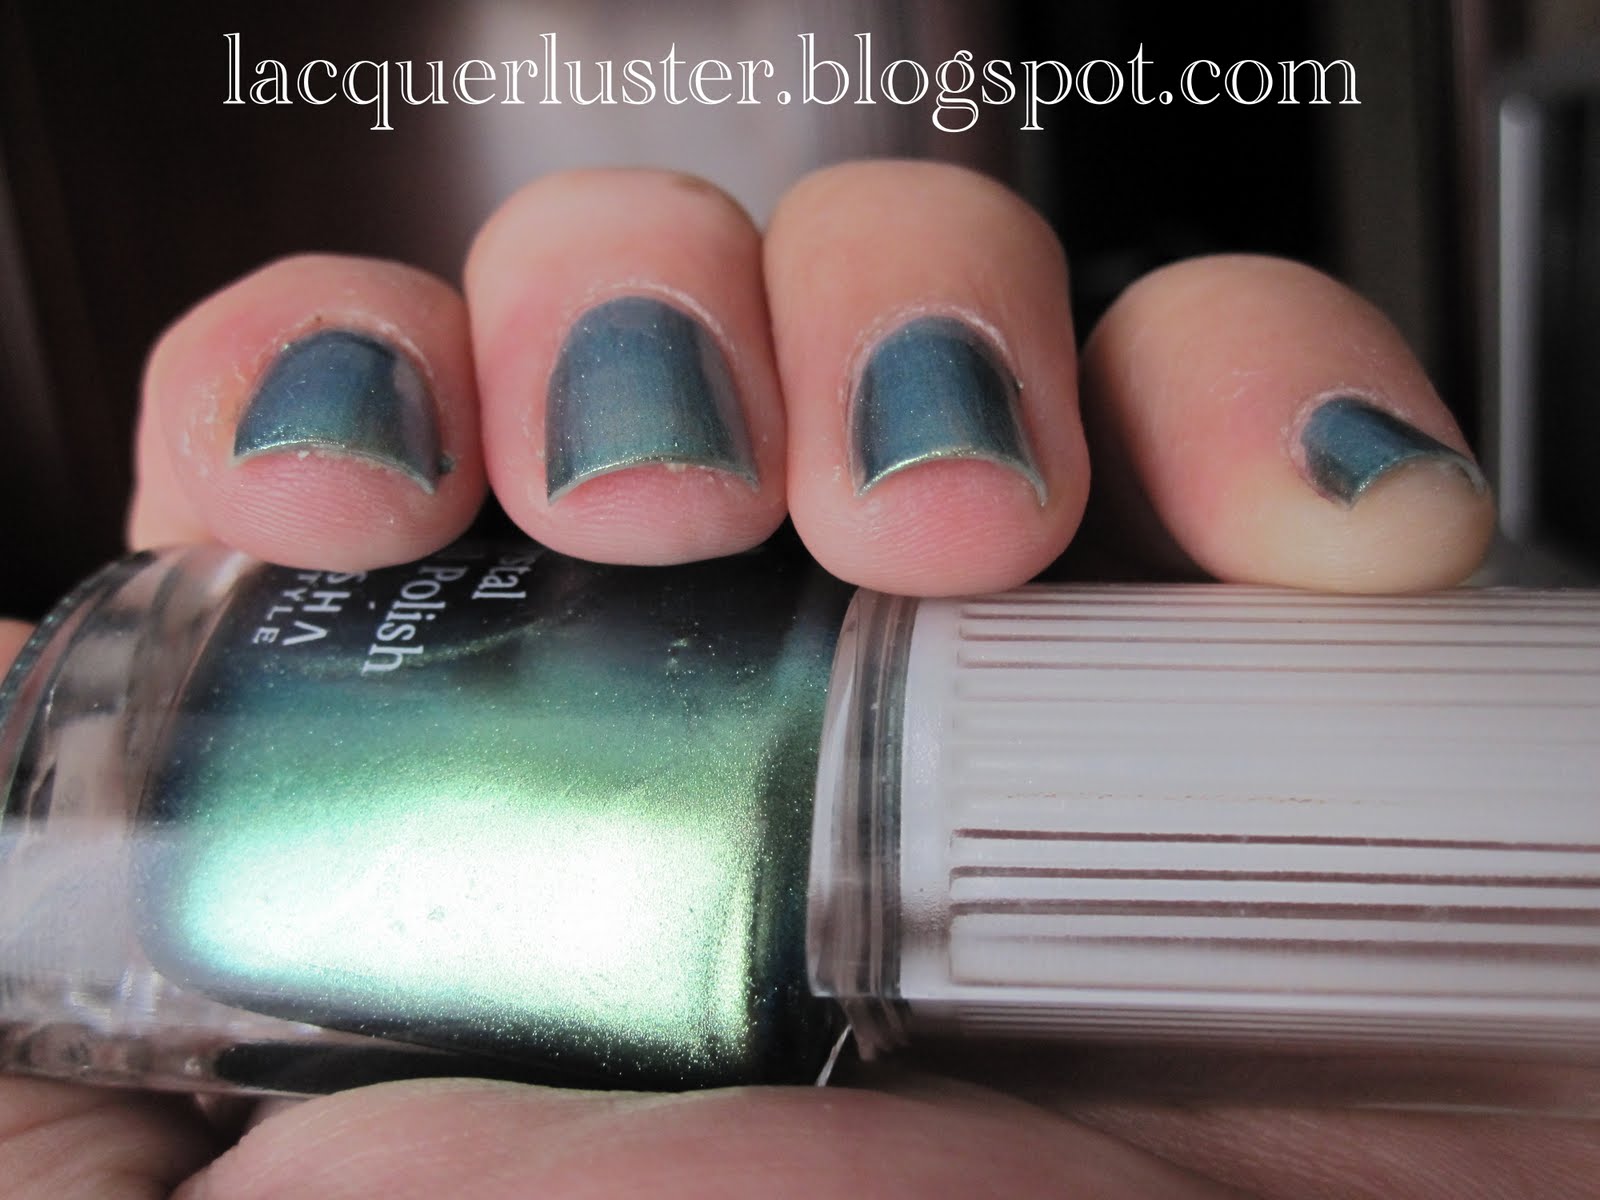
Here's one of the polishes I bought while in Korea, Missha HGR001 (wish the names were a bit more creative...):

 Isn't it gorgeous? It's a beautiful duochrome, or maybe multichrome? Depending on the lighting it looks apple green, deep sea blue, teal, and just about everything in between. I also love that it's a metallic! It reminds me of the Chameleon polish I tried. The formula was perfect, super easy to work with and dried pretty quickly. I am wearing two coats with no base or top coat in the pictures (didn't have any with me in Korea).
You can buy Missha products on their US website, www.misshaus.com.

You can buy Missha products on their US website, www.misshaus.com.
Tuesday, April 19, 2011
Black/Blue Mani
I did this one a while back but I wasn't very happy with it. Besides the fact that the overall look is kind of sloppy and random, the black acrylic powder I used to make the bow smeared everywhere. I had to paint over some parts with the nail polish again, making it look really messy.

The base is Color Club Take Me To Your Chateau. I did the bow on my pointer using acrylic powder and the one on my ring finger is just hex glitter pieces and a black rhinestone in the center. The lace parts are stickers.
Definitely not my best work but oh well, you learn from experience.

The base is Color Club Take Me To Your Chateau. I did the bow on my pointer using acrylic powder and the one on my ring finger is just hex glitter pieces and a black rhinestone in the center. The lace parts are stickers.
Definitely not my best work but oh well, you learn from experience.
Tuesday, April 5, 2011
Essie One Day Without Blues = Coat Azure CONFIRMED!
I suspected this so I did a search and found this:
http://holographicheather.blogspot.com/2011/03/why-im-blue-about-one-day-without-blues.html
Yup, it's the same as Coat Azure. So, if you missed out on the Toms/Essie promo, you can still pick up the color!
In other news, sorry for not posting in a while! I've just been lazy about uploading photos but I will be updating soon!
Friday, March 25, 2011
Zoya Kotori, Crystal, Charla Comparison
I did this at someone's request but I thought I'd post it. I don't have Charla, so I used Orly Halley's Comet instead.

L to R: Kotori, Crystal, Halley's Comet
One coat:

Two coats:

Three coats:

At this point Halley's Comet was opaque so I didn't add any more.
Four coats (three coats of Halley's Comet):

At this point Crystal was opaque, so I didn't add any more.
Five coats of Kotori, four coats of Crystal, three coats of Halley's Comet:

With top coat:

As you can see, they are very different. Kotori, the sheerest, is a dark charcoal base with lots of blue microglitter. Crystal is a metallic light blue with lots of gold flecks. Halley's Comet is teal with yellow-green sparkle. From what I have read, Charla is slightly more blue and more sparkly, but they are very close. All of these formulas were very easy to work with and dried fairly quickly.
In conclusion, these three colors really aren't similar at all and it's worth having all three!
Wednesday, March 23, 2011
Essie One Day Without Blues
A couple of weeks ago Toms shoes had a sweepstakes to win a free bottle of Essie polish to push their "One Day Without Shoes" event. It's a special color made especially for the collaboration, One Day Without Blues. I guess I was one of the 5,000 winners! I received my bottle today.


It looks like Coat Azure to me (perhaps a bit less green-toned), but I don't have it to compare. It's a dusty cornflower blue cream with subtle silvery shimmer, a bit brighter than in the picture. Formula was great, very easy to work with, on par with high-end brands. I am wearing two coats, but you might be able to get away with one. Very pretty color, but not particularly unique. Still, I'll never complain about free polish!


It looks like Coat Azure to me (perhaps a bit less green-toned), but I don't have it to compare. It's a dusty cornflower blue cream with subtle silvery shimmer, a bit brighter than in the picture. Formula was great, very easy to work with, on par with high-end brands. I am wearing two coats, but you might be able to get away with one. Very pretty color, but not particularly unique. Still, I'll never complain about free polish!
Saturday, March 5, 2011
Cover Girl AntiFreeze Over MAC Spirit of Truth
I saw AntiFreeze on Scrangie and I thought it was pretty, but it runs about $12 shipped on ebay. I couldn't bring myself to spend that much on drugstore polish. I know it's available at some Dollar Tree locations but I couldn't find it here. I finally saw it on ebay for around $5 so I jumped on it. I received it in the mail and I was excited, but it looks pretty unassuming--ugly bottle, weird green base, just kinda blah. I was so wrong!


I truly think this could be my best polish purchase ever. I can't stop looking at my nails! I know Essie Starry Starry Night is the big lemming for everyone and I've never seen it IRL, but I really think this is better. SSN is kind of like what the night sky looks like from earth but AntiFreeze (over a dark color) is what the sky looks like in space! This is two coats over Spirit of Truth, obviously you can use more for more glitter. AntiFreeze is a mix of silvery-green iridescent glitter and electric blue(!) iridescent glitter. The electric blue is what really makes it amazing. I really adds a lot of depth, making it look almost 3D over darker polishes. Over Spirit of Truth, it definitely looks like the glitter is in the polish, not just on top. I couldn't capture its true beauty in my pictures, but this could be my favorite polish out of all the ones I own. I normally think back-ups are kind of silly, but I NEED a back-up of this (or two, or three).
As amazing as it is, there were some cons. It took quite a long time to dry, though it wasn't much worse than many others I've tried. I waited a good 20-30 minutes for it to dry by itself before I decided to just add some Seche Vite. It was still soft underneath, but it's pretty much dry now, ten hours later. I can still make some dents if I press hard enough. Also, the smell was terrible! I'm guessing it's not 3-free and I was smelling one of those big 3 chemicals? The smell has dissipated, though.
Spirit of Truth I had no real complaints about. It was very easy to work with and offered great coverage; you could probably get away with one coat but I did two just in case there were any bald spots. Not the most unique color, but if you are looking for a true navy cream that doesn't look black, this is a good one! Plus, the packaging is so freaking cute!
Go out to your local Dollar Tree and hunt this one down!
Thursday, March 3, 2011
Chanel Pastel Skittles
I knew I wanted to try one of the Chanel pastel colors I have but I couldn't decide which, so I did all of them!


I thought the combination of colors by itself looked a little random, so I added some square rhinestones and little beads to pull it together a bit more. I think it's a nice, subtle way to add a little something without getting too complicated. The colors I used were Riva, Lilac Sky, and Pêche Nacrée.
Riva is a light blue cream with blue "hidden shimmer." The shimmer really isn't very noticeable. I found the polish to be rather sheer, but not too streaky. I am wearing four thin coats.
Lilac Sky is a lilac cream with a white shimmer finish. I found this one to be a bit sheer and also rather streaky. I am wearing three coats.
Pêche Nacrée is a peach frost. I found this one to be sheer, streaky, and you can kind of see the brushstrokes. Four thin coats.
I'm surprised at the formulas of these colors because the Khaki collection colors went on like butter! In any case, I'm sure these colors have lots of dupes out there and the money might be better spent on those. They certainly are pretty, though.
Monday, February 28, 2011
OPI Last Friday Night over Diamond Cosmetics It's Electrifying!
I did this mani a couple of weeks ago but didn't have a chance to post it until now! I really wanted to try LFN over a color that kind of matched the base, so that it would look like the glitter was embedded in the polish rather than just painted on top. I think I found a pretty good match!


For a while I wasn't that into the idea of glittery topcoats, I preferred polishes that were more opaque. I'm really having fun with this one, though! Can't wait to try it with some other blues.
I also recently got a Bergdorf Goodman gift card and used it to buy some Chanel polishes:

I want to try these out soon. Honestly I probably wouldn't have purchased them with my own money but I didn't mind "splurging" with a gift card.
Subscribe to:
Posts (Atom)