Showing posts with label green. Show all posts

Thursday, August 25, 2011

Zoya Ivanka

Yikes, I've been away for so long! I've been pretty busy lately and school is starting soon so I probably won't be able to post as often as I'd like. :( Oh well, here's a nice swatch for now!

This is Zoya Ivanka with Zoya Apple on the ring finger. Ivanka is a green jelly with green-gold flaky glass flecks, so pretty! Apple looks like a paler base with the same flecks but more concentrated, almost like a foil. Both are lovely greens for summer! Zoya really does this finish well in many colors, it has the sparkle of a glitter but it dries smooth and is easy to remove. I think this is four coats? I tend to do thin coats, though.

Hope you all are ready for fall!

Sunday, July 31, 2011

Mint Green Jewels

I was in the mood to do something fun so I decided to try this mani:

I simplified it a little bit because my nails are so much shorter than the ones in the picture, but I like the results!

First, I painted my nails with Revlon Minted as the base. Then, I used a small brush to paint an outline with Diamond Cosmetics Party Hearty. It's a rose gold as opposed to the regular gold in the picture, but I think it works well enough. Lastly, I added the rhinestones and bullion beads. It's actually not as complicated as it looks! Gluing on the beads/stones takes a little bit of time but it's so much easier and faster than, say, painting a floral print. I love the placement of the stones but I think my favorite part is actually the gold outline, I like the way it frames the mint green. As I've said before, I love doing manis with lots of rhinestones because it looks ornate but isn't a lot of work. You can obviously experiment with different colors and placements as well of course. If you're intimidated by nail art, try something easy and sparkly!

Tuesday, June 14, 2011

Marble Confetti Mani

I've always thought that water marble manis looked cool but I had no idea how difficult it was! I had to experiment with a few different polishes before I got it right and also messed up a few nails before I got some decent patterns (decent, not great!).

I started with a white base, MAC Vestral White:

These are the colors I used:
L to R: Diamond Cosmetics Orange Blush, Color Club Almost Famous, Nfu-oh 553, American Apparel Office, Color Club Take Me To Your Chateau

Here is the first nail:
I couldn't find tape so I had to clean up all the polish from my skin later (didn't want to use Vaseline or something oily b/c it might leave a film in the water, preventing the drops of polish from spreading correctly).

Afterward, I added some heart-shaped glitter and colorful rhinestones. Here's the finished product:
It's not quite what I hoped for but I still think it looks fun, like birthday party decorations!

For more detailed instructions on water marbling (and better designs) check out this blog:
http://mysimplelittlepleasures.blogspot.com/
She's so pro! Hopefully I'll be just as good some day!

Monday, May 23, 2011

Nfu-oh 70

I know everyone goes crazy for Nfu-oh flakies and holos (as well they should), but I also really love their foils! There's only four true foils that I know of, 68-71, but they are lovely! This is one of the colors I was most excited about, number 70:
It's a lime green foil! Pretty unique. It was quite sheer for a foil, this is three coats. They dried rather slowly for a foil as well but about average for most polishes. The formula was about average too, not amazing but not too hard to work with. I really wish more brands made unique colors like this!

Saturday, May 14, 2011

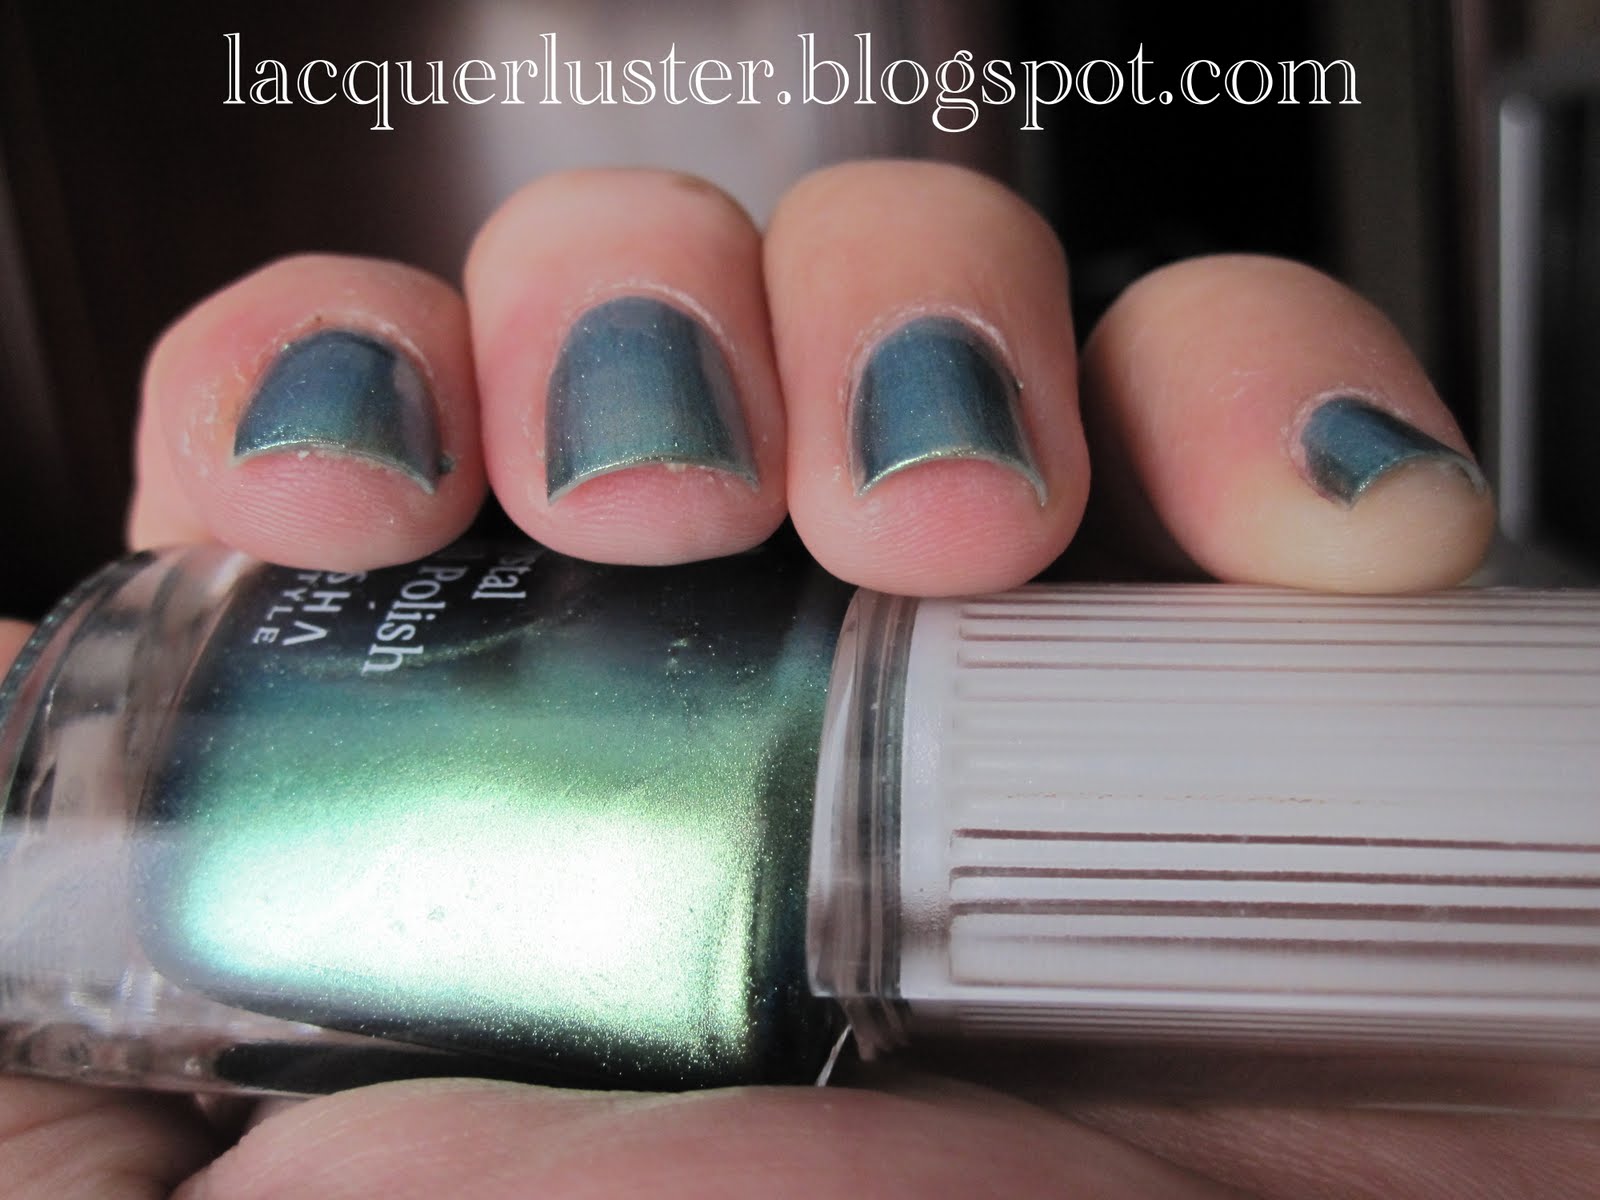
Missha HGR001 (Green/Teal Duochrome)

Here's one of the polishes I bought while in Korea, Missha HGR001 (wish the names were a bit more creative...):
Isn't it gorgeous? It's a beautiful duochrome, or maybe multichrome? Depending on the lighting it looks apple green, deep sea blue, teal, and just about everything in between. I also love that it's a metallic! It reminds me of the Chameleon polish I tried. The formula was perfect, super easy to work with and dried pretty quickly. I am wearing two coats with no base or top coat in the pictures (didn't have any with me in Korea).

You can buy Missha products on their US website, www.misshaus.com.

Sunday, April 17, 2011

OPI Dazzle Me over American Apparel Office

I think that my biggest nail polish love is light blue, but mint green is up there too; I have sooo many! Anyway, a friend of mine gifted me with OPI Dazzle Me, silver shimmer/microglitter in a pale green-tinged base. I thought this would be perfect over a mint green, so I wore it over AA Office:

I think this is two coats of Dazzle Me over two or three coats of Office. I really like this combo, it gives a bit more visual interest to a plain cream. Very nice topper.

Monday, April 11, 2011

MAC Quite Cute Bottle Comparisons

I picked these up on Friday and decided to do some quick bottle comparison pics.

Here's Ice Cream Cake (middle) next to Something About Pink (left) and Diamond Cosmetics Cotton Candy. ICC is a beautiful, blue-toned Barbie pink, and I really don't have anything like it. Definitely a keeper.

Here is Little Girl Type next to Essie Lilacism. This picture isn't the greatest but LGT is paler and a bit more gray-toned than Lilacism. I love pastels so I think it's worth owning both, but if you're not a huge lavender fan you can skip this one.

Mischievous Mint (middle) next to Revlon Minted and Essie Mint Candy Apple. Compared to Minted, MM is a bit darker and more blue-toned. Compared to MCA, MM is more green and just a shade darker. I think I will be returning this one since I have so many mint greens already.

Hope this helps!

Monday, March 14, 2011

St. Patrick's Day Mani

I actually forgot that St. Patrick's Day was coming up, I just wanted to wear a green polish. Once I pulled the polish out, though, it occurred to me that I could finally try an idea that I'd been wanting to do for some time.


My first 3D acrylic sculpture! This was inspired by one of Asami's pictures. Mine didn't come out quite as perfect, but I'm proud of it anyway (my right hand did not fare as well...). I know the heart is kind of random, haha. I just really wanted to do a heart! I originally had this over just green polish, but it looked so plain and the color of the shamrock was too close to the color of the polish:

I added a little glitter to make the shamrock stand out more and to make it more interesting overall.

The green polish is Diamond Cosmetics Froggy, a bright grass green. This is actually a neon. I was so excited about this, but ended up being kind of annoyed with it. I think the color is nice, but it's really sheer! In the last picture you can see that after four coats there was still visible nail line, and it took a pretty long time to dry. I added one very thin coat of Color Club Under The Mistletoe and it made it all better! Helps to hide VNL. It's one of my favorite glitters out of the many that I own! The glitter is actually made of small gold flakes so it covers well and isn't gritty (full review here). Next time I wear Froggy I am definitely using something opaque underneath it.

Thursday, February 3, 2011

Heart Glitter Mani

Yay, another heart/V-Day-themed mani! I did a very simple one this time, mostly because my nails are shorter.


Here are the colors I used:

L to R: Essie Pop Art Pink, Revlon Minted, HK for MAC Vestral White, Essie Lilacism

Here are the tools:

Just some heart-shaped glitter I bought on ebay. You can find this at some nail supply stores or craft stores, or you can try using confetti from a party supply store, or even nail polish with heart glitter in it already.

I used colors that reminded me of conversation hearts and basically just alternated them on my nails. You can use five different colors of course, but I think three or four looks a little less random. I used similarly colored heart glitter to put on top of the polish while it was still wet. I just moistened my fingertip to pick up the individual glitters and place them on the nail. You can use whatever tools you want to pick them up, of course.This is a cute and super easy mani to do, and it looks great on any length!

Eleven more days until Valentine's Day, hope you've made reservations!

Thursday, January 20, 2011

Floral/Bead Design

I love looking at Japanese nail magazines, they are so inspiring! I wanted to do a unique but fairly simple design, so I decided to try this one:

(From Nail Up July 2010.)

This is how it turned out:


(Click to enlarge.)
Not as nice as the magazine, but I still like how it turned out. The pastel green and floral print are very feminine, but the gold beads and contrasting coral red make it a little edgy.

Doing this design is pretty easy. For the base, you will need a minty green and a bright, coral red. In addition, you will also need burgundy, dark blue, and lighter blue colors for the floral design. Here are the colors I used:

L to R: Love & Beauty Blue, H&M Blue Sky, Essie Mint Candy Apple, Essie Red Nouveau, OPI It's a Doozi, Says Suzi

Here are the tools I used (besides remover, base coat, and top coat):

Beads, cotton pad, toothpick, small brush. I bought the box of little beads and the brush (part of a set) on ebay. The picture in the mag uses flatback beads but all I had are the small, round ones (some people call them "bouillon beads"). It would be easier with the flatback beads, but feel free to use whatever you have on hand.

The first step is to paint the base colors (easy enough). Then, while the nail polish was still wet, I worked on the beads. I poured some of the beads onto a cotton pad so they wouldn't roll around on the table. To the nails, I added a layer of top coat that is NOT quick drying. This provided a sticky base on which to stick the beads. I dipped the very tip of the toothpick into the same top coat to make it just a little bit sticky and used it to pick up the beads and place them on the nail. The toothpick I used has straight sides (as opposed to rounded) so I used the sides to press down the beads to secure them on the nail. If the top coat dries to the point where the beads do not stick, add a little bit more to the area where you are working. Cover with top coat (quick-drying top coat is okay for this step).

To do the flowers, I used a very thin brush to basically paint blobs. I painted coral blobs, added some burgundy bits, then painted light blue blobs next to the red, and finally added some dark blue dabs. It works best if you just kind of dab the brush instead of really trying to paint shapes. When you cover with top coat, smearing the design a little is okay, it actually looks better that way.

I also practiced doing some acrylic sculpture:

Spare Zoya plates/spoons are perfect for this! I have a pretty hard time getting the consistency right, even with Asami's tips. You have to make sure it's not too wet or dry, and quickly sculpt the little blob into what you want before it dries. I actually did a pretty decent bow (the middle one, not the one on the right):

I'm getting better at it, though, just need (lots) more practice. Hopefully I can do some fun manis with 3D acrylic sculptures soon!

Tuesday, January 4, 2011

Diamond Cosmetics Winter 2010

Sorry it took so long, but here are the swatches!


Moonsand, a pewter-silver foil. I love foils, and Diamond does some great ones. In the bottle I thought it had a slight bluish tinge, but it's really just a dark silver. The fact that it's more of a patina-ed silver color rather than a super shiny one makes it perfect for fall/winter. The formula was great, very easy to work with and they were dry to the touch quickly (as with most foils), but it took a few minutes for each layer to dry completely. I am wearing three coats in the picture.


Hypnotic. This is an intriguing green that leans toward teal, reminds me a dark green jade. It has a more yellow-toned emerald green shimmer, and maybe some gold? Understated, pretty, unique, reminds me of a peacock feather. Formula on this one was great to work with, opaque in two coats. I wonder how it compares to OPI's Here Today Aragon Tomorrow?


Starshine. I thought it was black in the bottle, but to my delight it is actually a dark, metallic, blue-toned anthracite with blue micro glitter. At first it just looks like the perfect dark metallic, kind of like one of Christian Louboutin's metal patent colors, but the blue glitter gives it even more depth and interest. The formula on this one was a bit watery, but not hard to work with (just be careful not to let it flood your cuticles). The first two coats were streaky but it evened out nicely with the third.


It's Electrifying is my favorite of the bunch (well, if I absolutely had to pick one)! It's an electric blue neon (yay!) with blue shimmer. Because it's a neon it dries to a satin finish, so you definitely need top coat to bring out the shimmer. It's bright and saturated at the same time and the shimmer gives it an extra dimension. This one applied nicely. You could actually get away with two coats if you don't mind visible nail line, but it turns out looking more teal than blue. Three coats are necessary to show the true color, and that is what I am wearing here.

Here are some comparisons.
Starshine next to Zoya Kotori:

Kotori has a darker base (that's not metallic) and a much more apparent blue shimmer. Kotori is also much sheerer.

Here's Orly Shine next to Moonsand:

As you can see, Shine is definitely brighter and it has closer to a chrome finish. Moonsand shows a little more texture because of the dark base.

Don't Teal My Heart Away next to Hypnotic:

Clearly, DTMHA is lighter in color and lacks the shimmer that Hypnotic has.

All of these colors are beautiful and unique, I have yet to be disappointed by Diamond Cosmetics! Part of the reason why I am posting this so late is because I really enjoyed wearing each color; I wasn't just swatching quickly like I do with some others (not that I don't love them too). For every color I can honestly say that I don't have anything else like it in my collection (although I don't have as many colors as some others). It's so refreshing as a winter collection, too; I love the mix of dark, bright, and metallic colors. It seems so appropriate for winter without being obvious (no holiday colors, no wintry whites). Drying time on these was a bit long; I would definitely recommend waiting a full 10-15 minutes between coats. Overall, though, I highly recommend all of them!

Friday, December 24, 2010

China Glaze Party Hearty

Here are some quick and dirty photos of my mani today before we head to the bf's mom's place:


China Glaze Party Hearty over MAC Jade Dragon. I love this, the different glitters over dark green are kind of like ornaments on a Christmas tree!

Happy holidays!

Tuesday, December 14, 2010

Color Club Object of Envy

I wanted to do something festive, so I went with a green glitter.

This color is super pretty, but I have been so spoiled by the Milani Rockstar glitters. This is five coats! Still, it's a lovely kelly green glitter and it's not as gritty as a lot of glitter polishes (Color Club seems to have smoother glitter somehow). Besides the fact that it requires so many coats, application was just okay. A bit thin, and took a bit long to dry (compared to most glitters).

Gotta get in all the holiday manis I can before they're over!

Tuesday, November 23, 2010

Rescue Beauty Lounge Teal and Sally Hansen Age Correct

Hi everyone, sorry for the lack of updates! I've been trying out a new topcoat and really wanted to see how it lasted before posting. First, though, the color:

This one was a bit of a surprise. It's really a true teal, a mix of blue and green, a bit on the darker side. Very pretty color, unexpected but understated. This is one coat, but as you can see, I should have added another. The flaws are highlighted because of the flash, though.

As I've mentioned before, I've been having a lot of problems with RBL polishes. I usually get a lot of wear out of nail polish, but with RBL I had been getting sizable chips literally within 12 hours of application. I looked up reviews on MUA and saw that one of the highest-rated base coats is Sally Hansen Age Correct No Chip Base and Top Coat (quite a mouthful). It has been discontinued, but don't worry, it's easily available on ebay and Amazon for around $5 shipped. As a base coat, it dried quickly. As a top coat, it took a bit of time (probably 10-15 minutes or so to dry completely) and although it does have shine, it applies thinly and doesn't give you that glassy finish like Seche Vite. Despite this, it held up well! I took the picture after four days, I think. It's my non-dominant hand, but my other hand looked about the same, maybe slightly more wear. This is only with one coat of polish, and for me less coats usually means more chipping. Overall, I highly recommend this product! I think next time I might try it as a base coat only, or add a coat of Seche Vite on top.

Why do they stop making such great products?!

Monday, October 25, 2010

Eyeko Military Polish

Sorry for the absence! My nails have been really brittle lately and I broke one and chipped another. I really need to moisturize more...

Anyway, a great and generous friend of mine recently sent me a bunch of nail stuff (among other things):

Some Eyeko polishes, Sinful colors nail art polishes, Priti NY polish, base and glitter polishes from transdesign, CND cuticle eraser, Halloween nail stickers, and mini match book emery boards! All very useful.

I've always wanted to try Eyeko, this is my first:

Military polish. I love this! It's a dark, murky, army green jelly. Such a great fall color. Application was great, opaque in two coats, which is what is shown here. I am wearing Seche Vite top coat in the picture, but the polish itself dried to a very glossy finish. There are some bald spots b/c I need to stop applying polish in poor lighting, haha.

At first glance I thought it looked like Chanel Khaki Brun, but when I put them side by side it's clear that Military is much greener:


I'll have to think of some fun Halloween nails to post soon!

Wednesday, September 22, 2010

Chanel Khaki Skittles

Ever heard of "Skittle nails"? It's a trend where people basically paint each nail a different color, usually creating a rainbow-type effect. I actually think it's pretty cute, but Asami did one where she sticks to a certain color palette and I think it looks more sophisticated (maybe even work friendly, depending on the colors and work place). When I saw the teaser pics for the Chanel Khaki collection, I thought those colors would be perfect for this type of mani! Funnily enough, it's suggested in the description of the polishes on the website. Here is my Khaki Skittles mani:

Left hand: Khaki Brun on pinky and index, Khaki Vert on ring and thumb, Khaki Rose on middle.


Right hand: Khaki Brun on pinky and index, Khaki Rose on ring and thumb, Khaki Vert on middle

I have to say that I was skeptical about Chanel polishes as I have never tried them before, but I am very impressed! Application was perfect, especially for a cream! I used two thin coats but could have gotten away with one good one. They dried quickly with a glossy finish, even without top coat. I wasn't sure about the look at first, but the more I stare at it the more I like it! I know some people have been doing camo manis with these colors but I'm not that skilled and I personally think this looks a bit more chic; the colors suggest camo but aren't as obvious as an actual camo pattern.

I'm always a sucker for packaging and the bottles are lovely of course, but they also came with a cute little drawstring bag:


All the shades are actually pretty great by themselves, surprisingly. I was only really interested in Khaki Vert at first but after I got it I decided I wanted Brun and Rose as well. Vert is a lovely army green, kind of a grayed sage. Brun is like a brownish olive, kind of muddy and swampy looking, very unique brown. Rose is pretty much a pinkish brown taupe. I'm not a big fan of taupes but this one is nice. Neutral but chic. I imagine this one is the most popular of the collection, though I personally like Vert the most.

Really loving all the new fall colors!