Showing posts with label Essie. Show all posts

Friday, September 16, 2011

Purple Tips and Lunula (with Bling and Bow!)

Finally, I had some time to do some proper nail art! Here was my inspiration:

Unfortunately, I still need quite a bit of practice when it comes to doing ruffles. Here are some of my practice attempts:

Getting there, but definitely not there yet. So, I decided to tweak the design a bit. I started out with Orly Bonder base coat and then, alternating tips and lunulas, did two coats of Essie Lilacism and Catrice Plum Play With Me (less red IRL).

Then I added rhinestones, a tiny pop ball chain, and a couple acrylic bows:

Ta-da! My bows still need a bit of work but I'm happy with the look overall. Obviously not the same as the picture but I still think it's super cute and got lots of compliments! Now I'm all ready for the weekend.

Saturday, September 10, 2011

Navy/Pink with Hearts

Blah, been so busy with school lately! I'm a full-time student x2 so I don't have as much time to do my nails. I'm trying to make some time, though. It's a hobby of mine and I do it to relax. I did find out that my esthetician class allows pretty much anything on your nails as long as the polish isn't chipped and your nails are short, yay! 

Anyway, here's what I've had on my nails recently, first pic is from a magazine. Please ignore the tip wear, these were taken a couple days after I did my nails (oh, and a couple pieces of glitter are missing!).


I tried using the little gold bullion beads but it was too difficult, the beads and glue were getting everywhere. It would have been a lot easier to use a tiny pop ball chain but I don't have one (yet). So, I thought some hex glitter would be a pretty good substitute. Also, in the magazine it looks like they used both pink and a peachy color, but I thought it would be a little too random-looking. It ends up looking pretty random anyway but I actually got lots of compliments (I think people like hearts!). The navy blue jelly is Nfu-oh 119, the pink is Essie Neo Whimsical. I do really like the contrast of the navy and pink, I'll have to keep that in mind.

Thursday, July 21, 2011

3D Rose

I really like 3D acrylic nail art but I need a LOT more practice so I don't do it very often. Every once in a while though, I like to just sit down and practice a bit. This is the result of my last practice session.
Here is my 3D acrylic rose with flower and leaf rhinestones. The peach color is Essie Van D'Go and the white is MAC Vestral White. It actually took me about a good hour to make two decent roses, haha. Honestly, I'm not super happy with the overall design (I think the rhinestones are a bit much) but I'm pretty proud of the flower! Now if only I could do it on the first try...

Thursday, June 16, 2011

Glitter Bindhi Mani

I saw this design in a magazine and it really caught my eye:
I love the way it looks like a beautiful, intricate bindhi design, so sparkly, feminine, and elegant. It also didn't look too hard (no time-consuming florals!) so I thought I'd try it out.

Here are the polishes I used:
Top row L to R: Milani Blue Flash, Color Club Take Me To Your Chateau, OPI Last Friday Night
Bottom row: no-name fuchsia glitter polish from Transdesign, Essie Splash of Grenadine, OPI Teenage Dream

First step was to paint little crescents with the glitter polishes, then shape them while the polish is still wet. I used a popsicle stick but an orange stick would be ideal.

Next, I painted French tips with the cream colors. I did this freehand but you can always use sticker guides of course.

Then, I added the sheer glitter toppers. As you can see the tips got a bit smeared so I would advise that you kind of pat the glitter on the tips rather than paint them on. This will minimize the smearing.

Last step was to add the pearls and rhinestones and a thick layer of topcoat:


After I had finished I realized I should have used a slightly darker blue but I still love the results! Rhinestone designs are a fairly easy way to make seemingly ornate designs without much effort. If you're not sure what you want I recommend buying one of the multi-sets on ebay for cheap. Born Pretty Store also has a whole kit you can buy with various rhinestones, orange sticks, dotting tools, and nail glue (link is my referral link).

If you're looking for nail art that is fairly easy but impressive, try this one!

Tuesday, May 17, 2011

Nfu-oh 52

I really wish I had purchased more Nfu-oh now that I'm back, but I'm just glad I was able to score the beauties I did. Here's number 52:
It's a sheer blue-based purple jelly with flakes that shine blue or green depending on the angle and lighting. This is four coats with no base or or top coat. There's still a bit of VNL but it's not very visible when my nails are this short. This color is beautiful, I really could not stop staring at my nails. My only complaint is that it did not dry very quickly, took quite a while actually. Still, the color is worth it and it lasted quite a long time.

Here it is with Essie Matte About You on top:
Mattifying it tones down the shimmer/microglitter and brings out the flakes. Very pretty.

Still have quite a few untried Nfu-oh but so far I have not been disappointed!

Monday, April 11, 2011

MAC Quite Cute Bottle Comparisons

I picked these up on Friday and decided to do some quick bottle comparison pics.

Here's Ice Cream Cake (middle) next to Something About Pink (left) and Diamond Cosmetics Cotton Candy. ICC is a beautiful, blue-toned Barbie pink, and I really don't have anything like it. Definitely a keeper.

Here is Little Girl Type next to Essie Lilacism. This picture isn't the greatest but LGT is paler and a bit more gray-toned than Lilacism. I love pastels so I think it's worth owning both, but if you're not a huge lavender fan you can skip this one.

Mischievous Mint (middle) next to Revlon Minted and Essie Mint Candy Apple. Compared to Minted, MM is a bit darker and more blue-toned. Compared to MCA, MM is more green and just a shade darker. I think I will be returning this one since I have so many mint greens already.

Hope this helps!

Tuesday, April 5, 2011

Essie One Day Without Blues = Coat Azure CONFIRMED!

I suspected this so I did a search and found this:
http://holographicheather.blogspot.com/2011/03/why-im-blue-about-one-day-without-blues.html

Yup, it's the same as Coat Azure. So, if you missed out on the Toms/Essie promo, you can still pick up the color!

In other news, sorry for not posting in a while! I've just been lazy about uploading photos but I will be updating soon!

Wednesday, March 23, 2011

Essie One Day Without Blues

A couple of weeks ago Toms shoes had a sweepstakes to win a free bottle of Essie polish to push their "One Day Without Shoes" event. It's a special color made especially for the collaboration, One Day Without Blues. I guess I was one of the 5,000 winners! I received my bottle today.


It looks like Coat Azure to me (perhaps a bit less green-toned), but I don't have it to compare. It's a dusty cornflower blue cream with subtle silvery shimmer, a bit brighter than in the picture. Formula was great, very easy to work with, on par with high-end brands. I am wearing two coats, but you might be able to get away with one. Very pretty color, but not particularly unique. Still, I'll never complain about free polish!

Monday, March 21, 2011

Color Club Volt of Light

I haven't seen many swatches for the Zoya Mod Mattes, so I was a bit hesitant to buy them. I love the idea of matte brights, though, so I thought I'd do a little experimenting with a matte top coat.


This is Color Club Volt of Light with Essie Matte About You on top. VoL is a neon yellow with green flash. I've read other reviews that said the formula on this was great, but I am wearing five or six coats and there's still some visible nail line. I still love the color, though, bright highlighter yellow. The green shimmer gives it a bit more depth but I think it looks a bit shinier than intended under Matte About You.

It's rainy and cloudy out so the neon yellow feels a bit out of place, but I love my neons!

Thursday, February 24, 2011

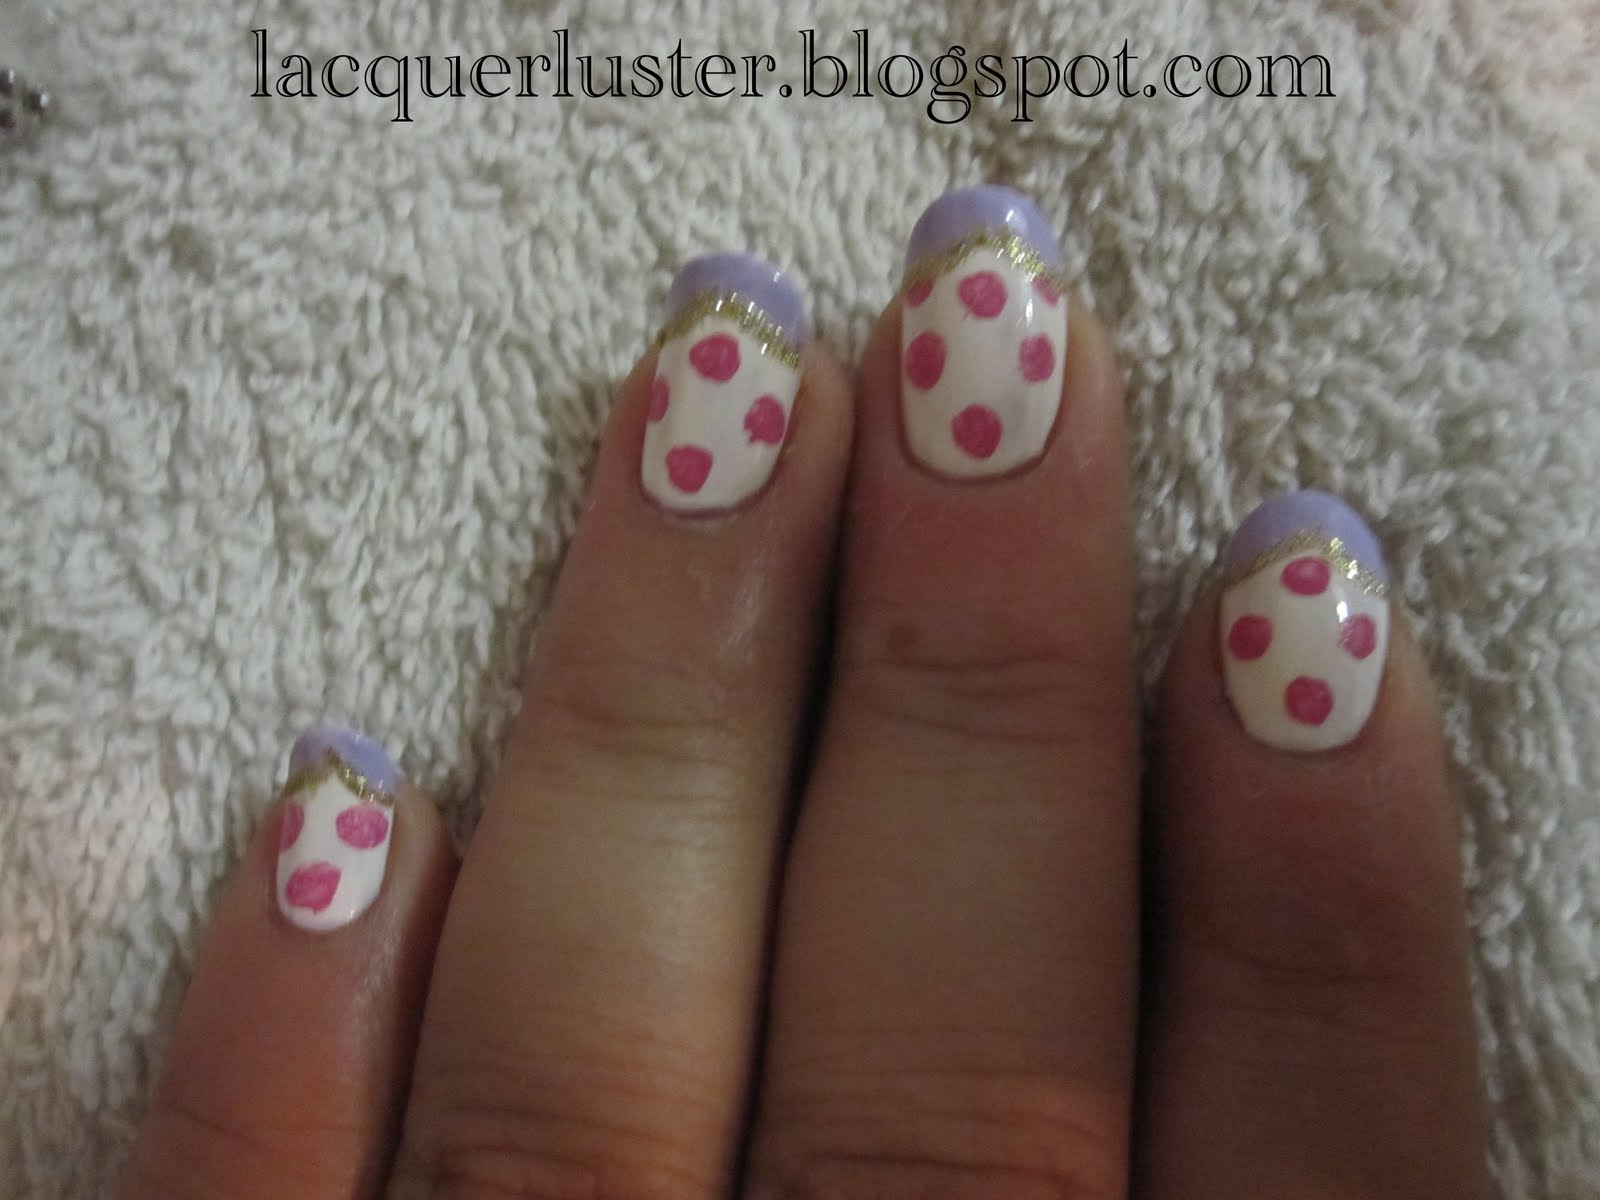
Floral Print w/ Lavender Tips

This design was inspired by a post in one of my favorite nail blogs, Cynful Nails. I've wanted to do it since I first saw it, but I wanted to grow my nails out a bit and file them into an oval shape. Isn't it cute? Mine didn't turn out quite as well, but I still love it. I think it might look better on longer nails.


Here are the materials:

Nail polish remover, a small piece of foil, some toothpicks (not pictured), rhinestones, cotton pads, nail art brushes (one with short bristles, another with longer bristles for striping), acrylic paint (I used magenta, white, and green), top coat, base coat, and the following polishes: MAC Vestral White, Diamond Cosmetics Like Satin, Essie Lilacism, and Color Club Sultry Diva.

The first step is to paint the base. I used four coats of Vestral White plus Like Satin to give it an ivory tone. I think this makes it look a bit more vintage. Like Satin is really sheer so I thought it would be easier to layer it on top of a white, but you can just use an off-white polish if you have one, of course.

Next, I used the striping brush to paint curves at the tips with Lilacism, then used the bottle brush to fill them in:


The next step is to squeeze out a little magenta paint and add some dots (for the flowers):

This is much more paint that is needed, you really only need a small drop. I used the short-bristled nail art brush for the circles:


For the gold glitter line, I added a generous drop of Sultry Diva to a small piece of foil:

Dropping the polish onto the foil lets it dry a bit so that the glitter can get a bit more concentrated and you don't need as many coats. Add more as needed (I think I needed three or four drops total), and paint over the curves you made with the lavender polish, using the striper brush again:


For the second color on the flowers, I mixed in some white paint with the leftover magenta (I used a toothpick, as you can see):


Using the short-bristled nail art brush, just dab at the dots you made earlier, painting on tiny dots and lines (this might be better to do with a toothpick):


For the leaves, I mixed the green paint with some white:


I used a toothpick to paint them on:


The final step is to glue on some rhinestones, then top it all off with top coat!


Ta-da! It was quite a bit of work, but I love it! So feminine and perfect for spring! This was my first time using acrylic paint for nail art, but I definitely prefer it over using nail polish. The paint is more pigmented and easier to work with so you can do more detailed work with a smaller amount. It also dries much more quickly than nail polish (or perhaps it's because you don't need to use as much). I'm excited to try more nail art!

I think I might do this mani again for my birthday next month; since it will be my second time I hope it will turn out even better!

Thursday, February 3, 2011

Heart Glitter Mani

Yay, another heart/V-Day-themed mani! I did a very simple one this time, mostly because my nails are shorter.


Here are the colors I used:

L to R: Essie Pop Art Pink, Revlon Minted, HK for MAC Vestral White, Essie Lilacism

Here are the tools:

Just some heart-shaped glitter I bought on ebay. You can find this at some nail supply stores or craft stores, or you can try using confetti from a party supply store, or even nail polish with heart glitter in it already.

I used colors that reminded me of conversation hearts and basically just alternated them on my nails. You can use five different colors of course, but I think three or four looks a little less random. I used similarly colored heart glitter to put on top of the polish while it was still wet. I just moistened my fingertip to pick up the individual glitters and place them on the nail. You can use whatever tools you want to pick them up, of course.This is a cute and super easy mani to do, and it looks great on any length!

Eleven more days until Valentine's Day, hope you've made reservations!

Monday, January 10, 2011

Pink Lace Nails

I love lace and super feminine manis, so it's no surprise that this could be my favorite so far! This is a super easy mani to do with stickers. Enlarge to see details. (Excuse my sweatshirt in the background.)

I was inspired by the intricate gel nail creations that are so popular these days. To mimic the look of gel nails, I used a pink jelly as the base, Diamond Cosmetics Sugar Coat Me. It was a bit paler than what I was hoping for, so I did a coat of Essie Petal Pink (a sheer pink) over it to deepen it just a shade. Also, on gel nails, the lace is usually acrylic sculpture but I used stickers. If you want them to look even more gel-like, do a thick coat of topcoat on top, so that the lace looks almost suspended in the nail. I thought the rhinestone was a nice added touch, gives the mani just a little bit of sparkle!

These are the stickers I used:

These are very cheap and easy to find on ebay, just do a search for "lace nail stickers." They are thin and don't stick very well, so I would recommend doing this while the nails are still wet. Remove the lace strip from the backing with a pair of tweezers. Carefully place it on your nail, then use small manicure scissors to trim away excess. Once the nail is a bit more dry, carefully press the sticker onto the nail so it's secure. Once it's dry, go over the entire thing with top coat. If there are parts of the sticker that are lifting up, glue them down with a bit of top coat and then go over that area again. If you want to do rhinestones, my set came with stickers with rhinestones already glued on, but if yours does not, I would recommend gluing the rhinestones onto the sticker before applying to the nail. I placed my lace in kind of a random pattern, but obviously you can be as precise as you'd like.

Close-up:


I can't stop looking at my nails! I've ordered some more lace stickers and will definitely be doing more of these!